Paclet Workflow
| Configuring a developer session | Documentation |
| Packages and Paclets | Deployment |
| Package Development | Concluding tips |
| Unit testing | Concluding remarks and nod to developers. |
The Wolfram Language is renowned for revolutionizing computational exploration but less well-known is its ability to translate computational discoveries into scalable computational systems. In particular, achieving such an outcome depends on developing an efficient, repeatable workflow for creating, testing, documenting and deploying paclets. This how-to presents one such workflow by combining functionality from the built-in paclet framework with new capabilities introduced in CodeAssurance. By following such a workflow, your computational discoveries can be more readily transformed into computational applications.
There already exists a range of comprehensive tutorials, how-to's and excellent tech notes on paclets in the Documentation Center so why provide yet another one? There are three main reasons:
The paclet's existing documentation remains an important, authoritative reference and CodeAssurance aims to enhance these foundations by augmenting further to present a proven process for building reliable, robust WL-based computational systems.
CodeAssurance provides assurance for code during development including the following configurations:.
| DeveloperOn | ensures that developer paclets are found first |
| DeveloperOff | ensures that deployed paclets are found first |
| $DeveloperDirectory | the designated directory for storing developer paclets |
| $DeveloperPath | the list of directories searched when locating developer paclets |
DeveloperOn[] ensures that paclets under development are found first when either loading code, viewing documentation or locating test files. It returns the list of directories currently considered developer locations.
DeveloperOn works by adding to the developer environment all locations currently in $DeveloperPath which typically contains at least $DeveloperDirectory.
Additions to $DeveloperPath therefore, are only required if developer paclets are to be stored in directories outside $DeveloperDirectory.
$DeveloperDirectory is located within $UserBasePacletsDirectory which also contains a variety of paclet-related directories:
The Repository directory in the previous list is an important one because it is where system updates as well as third-party paclets are installed during PacletInstall or, in CodeAssurance, where PacletDeploy places its developed paclets. Indeed, at the file-system level at least, CodeAssurance's entire paclet development philosophy can be boiled down to the journey of taking paclets in the Developer directory and whipping them into sufficient shape for eventual transferral into the Repository directory as a finished product.
Packages make up the backbone of any significant computational system built in the WL but their design and development is an expansive and deep subject worthy of dedicated exploration in its own right. What will be focussed on here however, is one critical aspect of package development, namely, paclet integration.
Paclets can be conceived as a powerful means to distribute and update WL resources. Paclets are officially described as containing "units of Wolfram functionality" but their typical payload invariably consists of packages that add Kernel functionality. In supporting this main mission, paclets can also house related resources, two of which are indispensable to an application's successful promulgation, its Documentation and its TestFiles.
But not all paclets are created equal. There is a very important distinction to be made between two types of paclets in the WL, namely, developer and deployed paclets. Developer paclets are those ones within which editing and development takes place whereas deployed paclets are those ones permanently added to an end-user's environment. In CodeAssurance's designed workflow, developer paclets are iteratively improved until deployed by invoking PacletDeploy.
The distinction between these two different types of paclets is easy to overlook because a paclet is notionally created simply by placing a PacletInfo.m file in a folder containing all of a paclet's components. The attraction of such design comes from existing resources being made immediately available simply through the addition of a single file. In practice however, professionally-released code is rarely produced in this way since it more typically requires the iterative and mutually-dependent development of multiple resources including, as mentioned, Documentation and TestFiles.
Best practice development therefore, involves setting up developer paclets from the get-go using CreateDeveloperPaclet, refining its resources in-place, testing in-situ through periodic PacletDeploy invocations before finalizing with a PacletDeploy invocation using its "Release" option. Failing to inculcate this distinction between developer and deployed paclets can create unexpected errors when using the paclet system. It is to avoid this and make this demarcation sharp that CodeAssurance designates $DeveloperDirectory as the default location where a developer paclet is placed by default in CreateDeveloperPaclet.
| CreateDeveloperPaclet["name","package"->{"fn1","fn2", …}] | creates a paclet called name that includes a package with exports "fn1" and "fn2". |
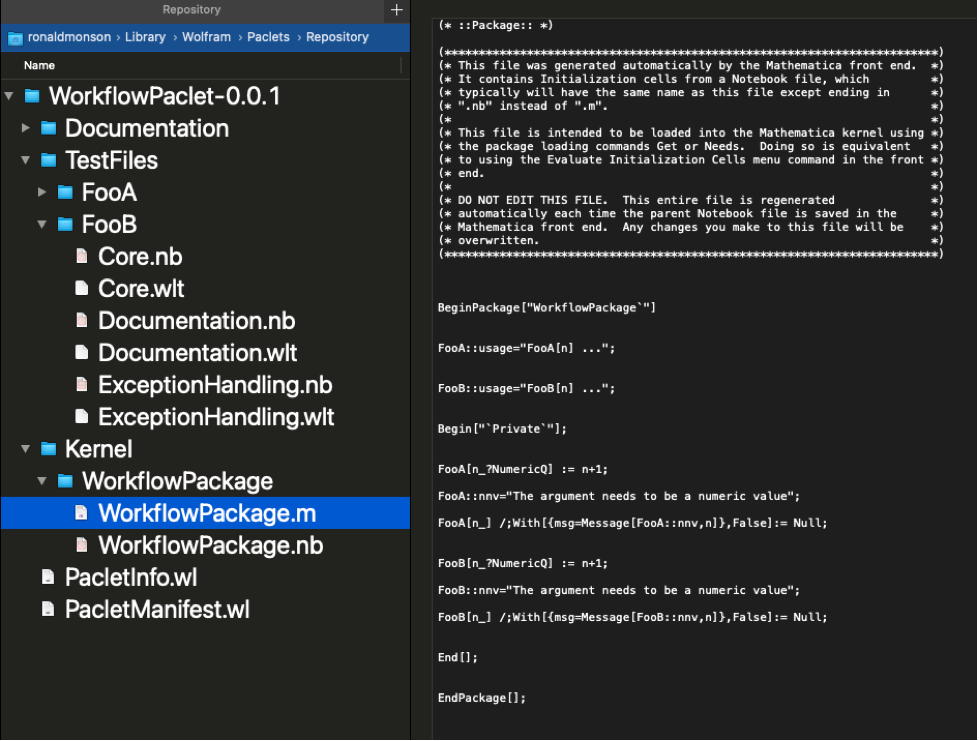
The created paclet has folders Kernel, Documentation and TestFiles as a minimal requirement for creating robust and assured code in a WL application. This layout is depicted below.
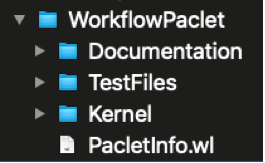
Code implementing a package's functionality appears in the Kernel subdirectory which for WorkflowPaclet defines a WorkflowPackage that itself provides functions FooA and FooB.
The package is now available for loading
With a package's outline now in place, the challenge of designing a package's functionality can begin in earnest as functional outlines are progressively chiseled into genuine capability.
The layout of the package files included in this example suggests one possible workflow consisting of writing code in a notebook (e.g. WorkflowPackage.nb) with its initialization cells containing content that is automatically saved into a corresponding package file (e.g. WorkflowPackage.m) for final loading. CreateDeveloperPaclet sets up this workflow via its "PacletLayout"->"ClassicNotebook" default option. Alternatively, the setting "PacletLayout"->"Classic" creates a workflow with code directly editable in .m (or .wl) files including alternative IDE's if desired.
The actual layout of a package's directory structure can change depending on the size and scope of a project but whatever structure is chosen, it needs to be accompanied by a practice of fundamental importance--unit-testing.
A truly enabling testing framework must possess scalability --this precious ability to maintain usability and performance in the face of exponential growth. The lightweight but powerful TestSummary provides such functionality in combination with its helpers, test file organizers TestFile and TestFiles.
| TestSummary | generates a summary of collections of unit tests |
| TestFile | returns a test file associated with a given function |
| TestFiles | returns test files associated with a given function or paclet |
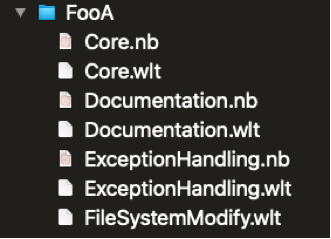
These functions' successful operation depend on a paclet's underlying file structure having a certain form. In particular, it depends on a TestFiles directory existing within the corresponding paclet along with test files placed according to the function whose functionality they are testing. Such a structure is automatically created by CreateDeveloperPaclet based on the function names provided as input which in our case of the function FooA looks like the following.
As observed, three testing categories are automatically generated in CreateDeveloperPaclet which can be considered as minimal starting points for a sound testing regime--but ones that can inevitably expand as a paclet or package evolves. These categories are: 1) Core 2) Documentation 3) ExceptionHandling as described next.
Core
The units tests associated with a function's core usage should exemplify a function's basic and essential application. They are usually the first ones tested and introduce signature functionally.
Documentation
The unit tests associated with Documentation consist of all tests corresponding to all the examples provided in the documentation outside those already appearing in core usage.
ExceptionHandling
The unit tests associated with ExceptionHandling consist of all those tests specifying how your system elegantly handles unexpected input.
Performing testing
With this layout in place, fine-grained or holistic testing for each function is immediately available. For example, in our example, six tests that have been created for the FooA which can be readily run and summarized.
These six tests are taken, by default, from all *.wlt test files in the "TestFiles/FooA" directory but more granulated testing is also possible.
Confirm that these files were the ones used in TestSummary@FooA.
Accessing Tests
TestFiles and TestFile, provide a bridge to WL's built-in testing framework itself centred around TestReport. For example, the syntax connecting test files to a selected function, as used in a TestSummary, can effectively also be used in TestReport when mediated by TestFiles.
Generate a test report of all the test files associated with FooA before accessing all the test objects used.
Comparing .wlt vs .nb test files
By default, functions in CoreAssurance generate summaries from .wlt files rather than .nb files as these are typically orders-of-magnitude more efficient to run. This is because .wlt test files contain only the raw test expressions that make up a test suite. On the other hand, .nb test files contain not only the raw tests but also the interface elements needed to add, edit and manage the tests in the file. A useful workflow that gets the best of both worlds then, is to benefit first from test notebook's interactivity by first composing tests into a .nb test file but then benefitting from more efficient testing by saving these notebooks into a corresponding .wlt file. The mechanics of setting up such a workflow are now described.
From the resulting test notebook, the standard way to create a corresponding .wlt file is via the Save As .wlt menu selection
Tip (Auto-saving as a .wlt file) : Although there is no built-in setting that enables a .wlt file to be automatically generated from its source .nb counterpart, CodeAssurance's palette provides a button that imbues all currently open test files with exactly this behaviour.
Clicking the button "Set files to generate .wlt" modifies the "Save" option for all currently-open test notebooks (other open notebooks are left untouched) so that subsequently saving these test files also generates a corresponding .wlt file in the same directory.
Gotcha: Unfortunately when performing a Save as .wlt there seems to be a long-standing WL bug from a memory leak that frequently prevents tests from being properly extracted. This can only be circumvented, as far as we are aware, by quitting the kernel and repeating the Save as .wlt menu selection but this time in a fresh kernel without any interfering leakage.
Gotcha: An ExceptionHandling test that produces a message but also returns the input expression unevaluated needs its expected field to be wrapped in Unevaluated lest this error message also appear when the test is run.
Despite being predominantly a container for conversion into more efficient .wlt files, CodeAssurance` functions like TestReport, TestSummary, TestFiles etc. can all be fed notebook test files for preliminary checks or as desired.
Alternatively, the type of file used in testing can also be specified via the "TestFileExtension" option although using the default .wlt files is invariably more efficient given that its test extraction is effectively being pre-computed.
Run, summarize and time all the tests currently existing in WorkflowPaclet (effectively all the tests associated with FooA and FooB) using first .nb test files and then using .wlt test files.
Tip: Not only do .nb test files take substantially longer to run but they also contain a much larger filesystem footprint. Compare the respective file sizes of both .nb and its .wlt test files associated with FooA's core tests.
Later we will see that for this reason, when releasing a paclet, it is good practice to only deploy .wlt test notebooks while reserving their .nb counterparts for the developer environment.
ExcludedTestFiles including "FileSystemModify*" forms
Sometimes a package's functionality will involve modifying an existing file or adding a newly-created one to the filesystem. In a developer environment it is often convenient to avoid regularly performing such tests since file-system interactions can not only take significantly longer but end-users' file permissions may prevent such tests from taking place at all.
It is good practice therefore, to place all tests that modify the underlying file-system into a dedicated test file named FileSystemModify that is then automatically excluded during testing.
Simulate the use of test file modifying the filesystem by copying a pre-made FileSystemModify.wlt and dropping it into FooA test files.
The full test suite for FooA now looks as follows (note we have departed from our "best practice" of having twin .nb and .wlt files only including the FileSystemModify.wlt file here for illustrative purposes).
By default, tests in FileSystemModify are automatically excluded with the Tests count remaining at 6 as before--two in each of the original .wlt files.
Suppose now however, that, despite taking longer, an exhaustive test run is required including any file-modifying tests.
Ensure that FileSystemModify.wlt is included in the suite of run tests as the Tests count increases to 7 .
Best Testing Practice
Categorizing unit tests into Core, Documentation and ExceptionHandling is recommended in order to establish a baseline for a minimal level of assurance in a WL codebases. Naturally however, richer categorizations are likely as a computational system matures. A maturing for example, canvass optimal file sizes, other categorizations or indeed the form of tests themselves.
Sound modularization practice suggests capping test files at a few dozen tests while other test categories are possible and indeed inevitable as a system grows. For example, further granularization in sophisticated documentation -e.g. Documentation1, Documentation2 ... etc. might be apt for elaborate super-functions or perhaps other types of test files like CornerCases, RemainingCoverage, ComputationallyIntensive, KnownBugs might become appropriate for your particular application.
The point is that whatever categorization is ultimately chosen, CodeAssurance functions like TestSummary, TestFile and TestFiles combine to establish a powerful framework for organizing and running test-suites of arbitrary granularity. In this way, WL's testing framework becomes genuinely scalable. An example of the type of seamless testing that results from following this protocol is provided in this Tech Note where the unit-tests assuring CodeAssurance's own correctness are exposed.
Documentation forms an integral part of WL-based computational systems and remains one of The Wolfram System's distinguishing features. Leveraging this pedigree then, offers a terrific opportunity to imbue your own code with similar levels of clarity, literateness and robustness.
Creating documentation in the WL is a two-step process; firstly documentation is created in notebooks by interacting with Documentation Tools before secondly, these pages are built into the pages loaded by the Documentation Center for viewing by end-users. Streamlining this editing-viewing cycle therefore, forms a core part of documentation's iterative improvement.
To start documenting our Workflow paclet we need to register the paclet with Documentation Tools via the Add Paclet menu item.
After navigating to and then selecting the folder containing the PacletInfo.wl corresponding to WorkflowPaclet, the paclet is added to Documentation Tools.
Tip: One of the more powerful programming paradigms in the WL is its expression of function-overloading whereby extensive functionality is packed into a single function name. In documentation this versatility manifests in the multiple usages lines that typically appear as banner applications on the function's symbol page that also correspond to its ::usage messages. If usage messages have already been written this correspondence can be leveraged to automatically generate banner applications. For example, after invoking CreateDeveloperPaclet, the paclet creates a starting template which in our WorkflowPaclet appears as the following in preparation for subsequent refinement.
Now entering FooA after clicking New Function Page in the Documentation Tools palette yields the authoring page with double usage here automatically formatted.
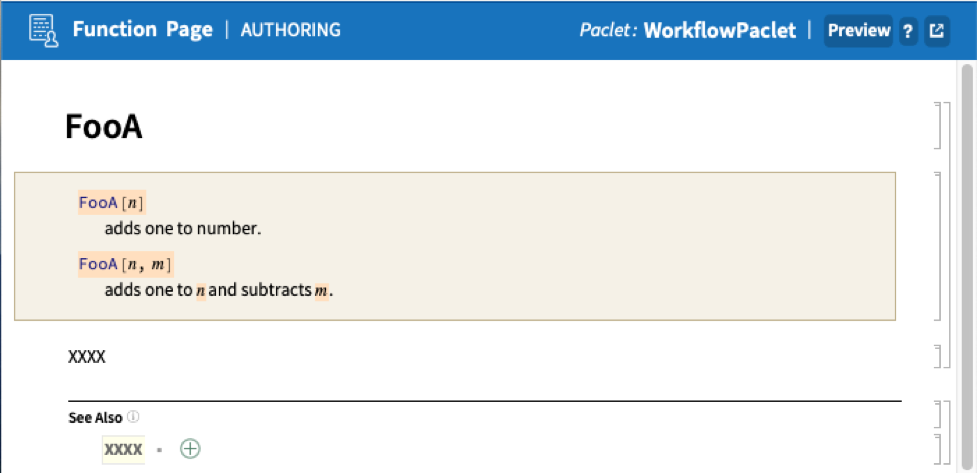
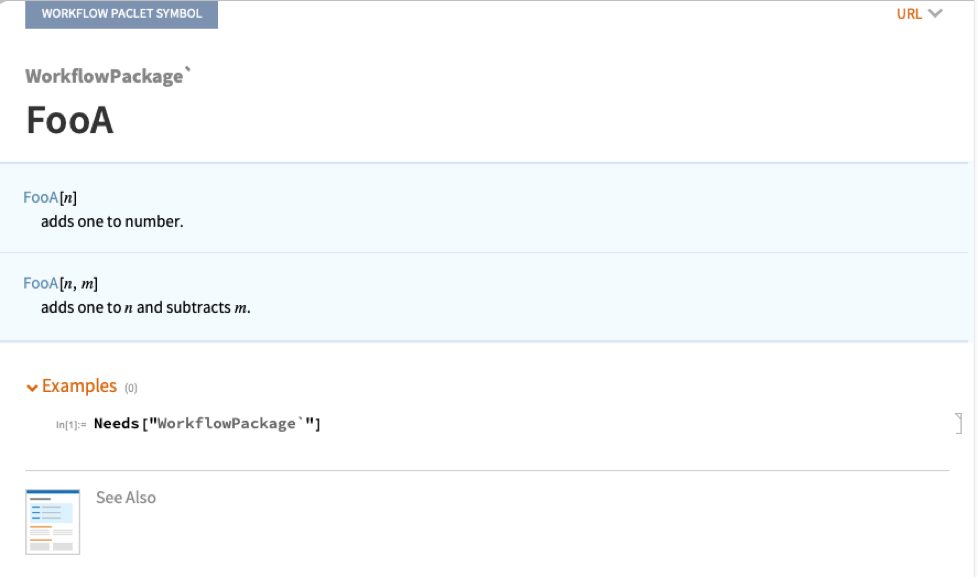
This authoring page can now be fleshed out with numerous examples as your documentation and code evolves. To see how the documentation is shaping up into its final form, a preliminary "built" version can always be quickly generated by clicking on the Preview button in the upper-right of the authoring page just shown. Doing so here, yields a page starting with the familiar Documentation Center appearance.
Tip: During an editing session, the Preview button can be used multiple times on the same authoring page to produce different "built" versions of the same page that can then be simultaneously viewed side-by-side. Comparing and contrasting different possible documentations visually in this way, can often lead unearthing the most "natural" invocation.
Tip: In writing documentation, so ubiquitous is the application of the Template Input button in Documentation Tools palette that it pays to learn its keyboard short-cut as specified in the menu short-cut Format ▶ [Template Input] (or integrate this shortcut into one's keyboard-entry environment).
Tip: Adding documentation of at least one function in this interactive way is required for a successful, subsequent invocation of PacletDeploy.
While previewing a single page in documentation is useful for readily obtaining a feel for its final appearance in the Documentation Center, it doesn't come with a full weaving into the help system (links, for example, won't immediately connect to other pages in a similar editing state). To achieve this more complete weaving, a fully-fledged, "official" build is required that ordinarily requires two build and install steps. In CodeAssurance however, these steps are compressed into a convenient function, PacletDeploy as described next.
While the demarcation between developer and deployed paclets is an important one, so too is the ability to seamlessly transition between the two; in particular, to transform a developer paclet into its deployed counterpart. This is the role played by PacletDeploy.
| PacletDeploy[paclet] | deploys a paclet into the local system |
The examples using WorkflowPaclet were previously conducted in a "developer mode" that is designed in some sense to simulate the final end-user experiences while currently being separate from it. For example, entering this mode with DeveloperOn[] ensures that executing <<WorkflowPackage` loads in the developer version of WorkflowPackage while the Documentation Centre displays non-built versions of the package's public functions.
Rigorous developers however, are unlikely to want to promulgate their code based only on testing performed in developing mode and instead, typically seek the assurance of a paclet's deployed performance on their own local system. For example, there may be some inadvertent hard-coding that currently only passes tests in the developmental environment but fails in a deployed one. Alternatively, there may be some unexpected interactions with other deployed paclets that only comes to light after deployment.
To ensure that any disparities between developer and built paclets are detected closer to their introduction, it is good practice to periodically invoke PacletDeploy to ensure a paclet's deployed performance remains on track. Further, the advantage of CodeAssurance is that such performance need not be divined osmotically but instead, can be systematically measured via its testing framework.
Natively, the way to "deploy" a paclet is to start by building it with PacletBuild. This produces a zipped .paclet file in a nominal build directory. Applying PacletInstall to this .paclet file then installs the paclet in a user's environment--effectively completing a deployment process. These two steps are conveniently combined in PacletDeploy along with some extra deployment options of its own.
Recall our developerPaclet and its location in $DeveloperDirectory.
Suppose that after a period of development it is desired to measure its performance and documentation in an end-user environment.
Deploy the developer WorkflowPaclet (note that successful deployment requires that Documentation has been added as described earlier in this tutorial).
Confirm the respective locations of developer and deployed paclets noting the extra versioning information attached to the latter.
End this kernel session In order to clear out all definitions and development documentation in preparation of simulating an end-user experience.
Load the deployed paclet to confirm that WorkflowPaclet has indeed weaved itself into the local system by providing access to its payload--WorkflowPackage.
Once deployed, clicking FooA shows its polished function page in the Documentation Centre (as also happens by typing FooA into the latter's search field).
Confirm that the previous assurance established during development similarly applies in situ or in the deployed context.
Another advantage of periodically invoking PacletDeploy is that it may already contain useful functionality well-before the paclet's final, polished release. Regular deployments to a developer's local system can be a good way to leverage the paclet's expanding utility.
Finally, apart from the aforementioned engineering advantages, regularly deploying paclets under development offers a psychological boost in the sometimes arduous journey towards completing a well-designed paclet. Regularly visualizing and running an envisioned computational system often provides a powerful motivational spur.
Gotcha: PacletDeploy uses the option setting ForceVersionInstallTrue by default to install the paclet over any existing paclet with the same version number (while leaving untouched newer paclets). Mostly this is desirable but not always.
Commercial Release
The paclet workflow described thus far describes a deployed computational system that contains all readable code along with any associated development files. This is often preferred in personal, institutional or research applications. Following the workflow to this point will have led to a deployed file layout in the Repository directory in the following form:
In other situations however, say for a commercial releases, removing development files and/or protecting a paclet's IP might be preferred. For example, it may be desirable to remove the .nb development files as well obfuscating any .m code files.
As we have Quit the kernel we need to re-establish our developer environment in preparation for a commercial deployment.
The deployed file layout in the Repository directory for a commercial deployment appears as the following:
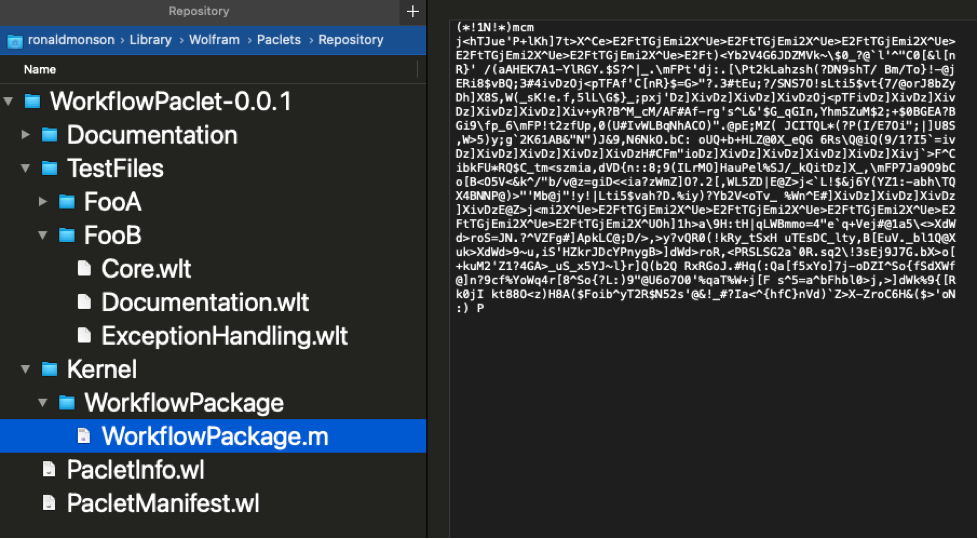
All .nb notebooks in the Kernel and TestFiles directory have been omitted in this commercial deployment as well as obfuscating kernel .m files.
As a final check, obtain an assurance that the deployed paclet continues to pass all previous tests.
Tip: Setting the "Release" option of PacletDeploy to "Standard" or "Commercial" effectively sets a collection of options that includes setting the "ExcludedFiles" option to "Kernel" "*.nb","TestFiles"{"*.nb", "*DeveloperOnly.*"}. Excluding the *.nb files by default ensures that all development and test notebooks are not ported to your end-users (since they will typically only be accessing their corresponding .m, .wlt files) but this default setting also specifies that files matching "*DeveloperOnly.*". are also to be excluded. This is designed to support workflows where testing certain functionality might be significantly progressed but still not ready for prime-time. Placing such tests in notebooks named DeveloperOnly.nb/DeveloperOnly.wlt ensures that these will not be ported during deployment.
End-users installation of releases
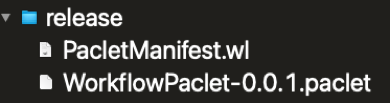
The standard way to add third-party paclets to an end-user's environment (Repository directory) is to apply PacletInstall to an .paclet archive file. When PacletDeploy[…, "Release"…] is invoked by developers, following a paclet build, this installation happens automatically in the developer's Repository directory. During this process with a "Release" option-setting however, a .paclet archive file (along with its accompanying PacletManifest.wl file) is generated and now stored in a release folder and which can then subsequently be delivered to end-users for a standard installation using PacletInstall.
As CodeAssurance becomes more fully integrated into a developer's workflow, additional seamlessness can be obtained by treating the package as a built-in. This can be simulated by ensuring that the package is loaded and configured at the beginning of each kernel session. Historically, package autoloading depended on correct path configurations but a more modern, maintainable alternative, is to take advantage of WL's persistence framework.
If CodeAssurance is being used continuously for development and across kernel sessions however, entering develop mode at start-up can be configured for additional convenience.
Tip: Ensure that developer mode is also automatically entered at start-up (assuming CodeAssurance has previously been set up to automatically load at start-up).
Now on start-up, not only is CodeAssurance automatically loaded but developer mode is also immediately entered.
Obviously developer mode can be exited at any time to return to an "end-user environment" by evaluating DeveloperOff[].
Finally, if other environment adjustments become more persistent, such as say, consistently changing $DeveloperPath or , regularly altering $ExcludedTestFiles, these too can be conveniently initialized in the same manner by including them in an $Initialization as desired.
This how-to is designed to explain the basic mechanics of paclet construction for a paclet/package developer and how it can be enhanced through CodeAssurance. Naturally however, writing clear, clean, systematic and widely-used paclets also means mastering the art of writing, explaining and testing code. Such endeavours are not unlike an artisanal quest to perfect what is surely one of this century's most important crafts. While this learning curve itself, is worthy of fuller treatment, it is beyond scope here save for one final takeaway.
Progressively populating the directories Kernel, Documentation & TestFiles that are generated during CreateDeveloperPaclet, defines a base-line workflow for attaining a minimal level of code assurance. A key part of their potential effectiveness however, stems not solely from their isolated refinement but also from their ongoing interaction during the design process. Well-designed paclets tend to emerge, not perfectly-formed from immaculate blueprints, but rather, from repeated interplays between the process of writing, documenting and testing code.
Concurrently documenting a function forces developers into the shoes of end-users as well as carefully examining how the function seamlessly integrates into existing functionality to which its documentation is being provisionally linked. Concurrently crafting unit tests, in contrast but equally as importantly, forces developers to prioritize pockets of functionality while the ongoing regression-testing it implements defines the indispensable scaffolding needed to make this iterative synergy inch upwards.
In other words, it is tempting to treat the writing of documentation and tests almost as an afterthought or as tasks ancillary to the main game of writing code. This however, is almost always a mistake since such tasks invariably end-up informing the original code-writing process itself which, in turn, informs new documentary and testing improvements as a virtuous feedback loop is set in motion. And it is through such motion that a function's essence ever-so gradually crystallizes, often at an agonizing clip but nonetheless often also with inexorable momentum. When this happens, what originally seemed like a purely inventive act can morph into one of exalted discovery.
Viewed in this way, an unrelenting effort to imbue code with correctness uncannily defines a coding practice naturally oriented towards sound paclet-design. Naturally, all these decisions unfold well before the end-product lands on a user's machine, but if it ultimately does just that, users, suitably oblivious to all these historical machinations, simply get to intuitively apply introduced functionality--and get on with making discoveries of their own.