Contents
Contents
1
.Brief Introduction to Unity
2
.Hands-on Demonstrations
2
.1
.Wrecking Ball Simulation
2
.2
.Playable Piano
2
.3
.Polyhedron Dodger Game
What is Unity?
What is Unity?
Unity is a world-leading game engine using by millions of developers.

Supports both 2D and 3D games for a large variety of platforms.

What does Unity Provide?
What does Unity Provide?
Industry Standard Physics Engine
Industry Standard Physics Engine
Unity uses PhysX for its physics engine. PhysX is a scalable multi-platform real-time physics solution supporting a wide range of devices, from smartphones to high-end multicore CPUs and GPUs. Unity supports a wide range of physical colliders, joints and other components, both in 2D and 3D. |

Lighting & Rendering
Lighting & Rendering
Unity provides options for both performant and high fidelity rendering. Many rendering effects run at real-time, but more complex lighting calculations can be baked to avoid running heavy calculations at runtime. Their more recent shader pipelines support shader authoring through a graph GUI. |

Extensive Built-In Utilities
Extensive Built-In Utilities
Unity also provides numerous tools for tasks such as terrain generation and navigation. In addition to the built-in tools, Unity provides a simple package system that allows users to import both Unity-made standard assets or user-made assets from the AssetStore. |
What does the WL Provide?
What does the WL Provide?
Scripting Environment
Scripting Environment
The Wolfram Language provides a unique powerful scripting environment for the Unity engine and the Unity editor. A Unity project can be created, launched, modified, monitored, and built – all from within a single Wolfram notebook. Users may also run Unity as a background process and use a notebook as the sole interface. |
Content Creation
Content Creation
The Wolfram Language allows for the easy creation of synthesized audio, colorful visuals and procedural geometric content. Wolfram Language users also have access to the Wolfram Knowledgebase – an extensive repository of curated data, including 3D models and textures. The Wolfram Language also contains numerous functions for processing this content and exporting it into all common file formats. |
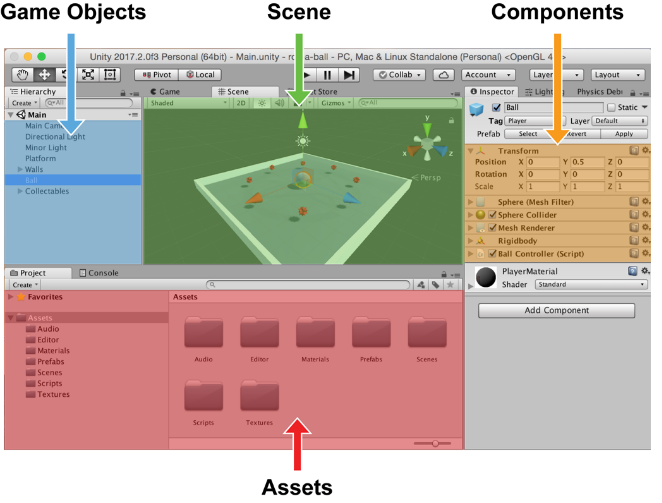
Introduction to Unity
Introduction to Unity
Before diving into Unity, let’s quickly review the four (4) key topics in Unity.
Scenes
Scenes
◼
The 3D environment which contains everything you see from UI to 3D objects (terrain, buildings, players, etc.).
Game Objects
Game Objects
◼
Exists within a single scene.
◼
Act as containers for components, which implement the real functionality.
◼
Everything in a scene is either a game object or attached to one.
Game Object Components
Game Object Components
◼
Control lighting, physics, audio, rendering, and more.
◼
Must be attached to game objects.
Assets
Assets
◼
Any file that can be used within your game.
◼
Exist within the Assets folder of your project.
◼
Can be referenced by components in one or more scenes.
◼
Examples: 3D models, audio files, images
Introduction to Unity II
Introduction to Unity II
In the Unity Editor, these can be found in the following areas.
Creating a Unity Project
Creating a Unity Project

2. Choose a version of the Unity Editor to install.
3. Once installed, load the UnityLink paclet.
In[]:=
Needs["UnityLink`"]
4. Create a new Unity project.
In[]:=
UnityOpen["/Users/alecs/Desktop/UnityDemos"]
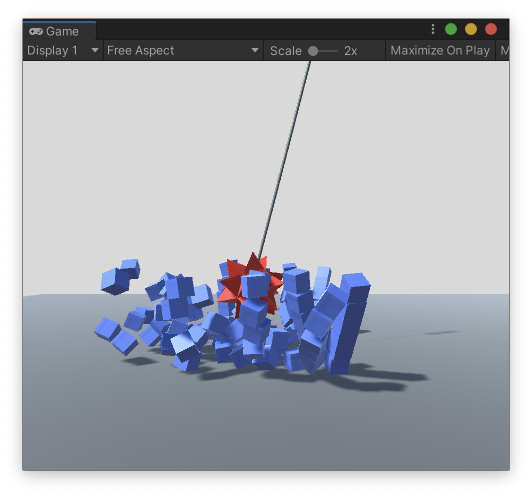
Demo - Wrecking Ball
Demo - Wrecking Ball
In this first demo, we will create a wall of cubes to be knocked down by a swinging wrecking ball. This will require:
◼
Creating scenes, game objects, and assets.
◼
Adding and modifying components.
◼
Using Unity’s physics engine (PhysX).
Falling Cube Test
Falling Cube Test
Let’s start with something simple – making a cube fall.
1. Create a cube game object.
In[]:=
gameObject=CreateUnityCube["MyCube"]
Out[]=
UnityGameObject
2. Show the default components on Unity’s cube primitive.
In[]:=
gameObject["Components"]
Out[]=
UnityTransform,UnityMeshFilter,UnityBoxCollider,UnityMeshRenderer
3. Apply physics to the cube using a Rigidbody component.
In[]:=
CreateUnityRigidbody[gameObject]
Out[]=
UnityRigidbody
4. Create a plane for the cube to land on.
In[]:=
CreateUnityPlane["Plane"]
Out[]=
UnityGameObject
5. Move and rotate the cube so it sits above the plane.
In[]:=
(*UsethePartassignmentsyntaxtosetpropertiesofUnityobjectsfromtheWolframLanguage*)gameObject[["Position"]]={0,8,0};gameObject[["EulerAngles"]]={30,45,90};
6. Switch the Unity Editor to Play mode.
In[]:=
UnityPlay[]
7. Exit Play mode.
In[]:=
UnityStop[]
Organizing the Project
Organizing the Project
Before going any further, it’s good practice to keep your Unity project organized.
1. Create some folders in the Assets directory.
In[]:=
CreateUnityAssetDirectory[{"Scenes","Materials","Prefabs","Scripts","Meshes","Audio"}]
Out[]=
{Scenes,Materials,Prefabs,Scripts,Meshes,Audio}
2. Create a new scene for the wrecking ball demo.
In[]:=
CreateUnityScene[File["Scenes/WreckingBall"]]
Out[]=
UnityScene
Now all of our changes can be saved to this scene file.
3. Create some Material assets. Materials are used to determine the appearance of rendered game objects (similar to graphics directives in the WL).
In[]:=
redMat=CreateUnityMaterialFile["Materials/Red"],grayMat=CreateUnityMaterialFile["Materials/Gray"],blueMat=CreateUnityMaterialFile["Materials/Blue"],
Out[]=
UnityMaterial
Out[]=
UnityMaterial
Out[]=
UnityMaterial
Creating a Prefab
Creating a Prefab
Our goal is to build a wall of identical cube game objects. We could do this by copying a single game object in the scene.
However, a better solution is to create a Prefab, which allows us to store a game object as an asset. Once the prefab is created, we can easy create instances of it in our scene.
1. Create another default cube game object.
In[]:=
gameObject=CreateUnityCube["Cube"]
Out[]=
UnityGameObject
2. Add a Rigidbody component.
In[]:=
CreateUnityRigidbody[gameObject]
Out[]=
UnityRigidbody
3. Assign the blue material to the cube.
In[]:=
gameObject["MeshRenderer"][["Material"]]=blueMat;
4. Create the prefab asset from the game object.
In[]:=
prefab=CreateUnityPrefab[File["Prefabs/Cube"],gameObject]
Out[]=
UnityGameObject
5. Delete the original game object.
In[]:=
DeleteUnityGameObject[gameObject]
Constructing a Wall
Constructing a Wall
1. Generate the positions of the cubes.
In[]:=
cubePositions=Flatten[Table[{x,y+1/2,z},{x,-4,4},{y,0,5},{z,0,1}],2];cubePositions//Short
Out[]//Short=
-4,,0,-4,,1,-4,,0,102,4,,1,4,,0,4,,1
1
2
1
2
3
2
9
2
11
2
11
2
In[]:=
(*Note:Unityconsidersthey-axistobevertical*)Graphics3D[{Cube/@cubePositions}]
Out[]=

2. Create a wall game object to act as the parent for all the cubes.
In[]:=
wall=CreateUnityGameObject["Wall"]
Out[]=
UnityGameObject
3. Instantiate the Cube prefab for each position.
In[]:=
cubes=Table[gameObject=CreateUnityGameObject["Cube",prefab];gameObject[["Position"]]=pos;gameObject[["Parent"]]=wall;gameObject,{pos,cubePositions}];cubes//Length
Out[]=
108
4. Create a plane for the wall to rest on.
In[]:=
floor=CreateUnityPlane["Floor"];floor[["LocalScale"]]={10,10,10};floor["MeshRenderer"][["Material"]]=grayMat;
Wrecking Ball
Wrecking Ball
1. Create a Unity mesh asset from the “Spikey” polyhedron.
In[]:=
spikey=RegionResize[PolyhedronData["Spikey","MeshRegion"],{5}]
Out[]=

In[]:=
mesh=CreateUnityMesh[File["Meshes/Spikey"],spikey]
Out[]=
UnityMesh
2. Create the wrecking ball game object using the spikey.
In[]:=
wreckingBall=CreateUnityGameObject["Wrecking Ball",mesh]
Out[]=
UnityGameObject
3. Add a Rigidbody component with significant mass.
In[]:=
rb=CreateUnityRigidbody[wreckingBall]rb[["Mass"]]=100;
Out[]=
UnityRigidbody
In[]:=
(*Rigidbodiesrequiremeshcolliderstobeconvex*)wreckingBall["MeshCollider"][["Convex"]]=True;
4. Add a Hinge Joint component to swing the wrecking ball.
In[]:=
wreckingBall[["Position"]]={0,20,16};
In[]:=
joint=CreateUnityHingeJoint[wreckingBall]
Out[]=
UnityHingeJoint
In[]:=
joint[["Anchor"]]={0,0,-16}
5. Create a cylinder to act as a support pole.
In[]:=
pole=CreateUnityCylinder["Pole"];pole[["Parent"]]=wreckingBall;pole[["LocalPosition"]]={0,0,-8};pole[["LocalScale"]]={0.2,8,0.2};pole[["EulerAngles"]]={90,0,0};
6. Apply materials.
In[]:=
pole["MeshRenderer"][["Material"]]=grayMatwreckingBall["MeshRenderer"][["Material"]]=redMat
Wall Destruction
Wall Destruction
1. Adjust the camera to give us a better view of the destruction.
In[]:=
camera=FindUnityComponent["Main Camera","Camera"]
Out[]=
UnityCamera
In[]:=
(*Movethecameratoabetterspot*)camera["Transform"][["Position"]]={24,6,-3};camera["Transform"][["EulerAngles"]]={0,-90,0};
In[]:=
(*Useasolidlightgraycolorforthebackground*)camera[["ClearFlags"]]="SolidColor";camera[["BackgroundColor"]]=LightGray;
2. Save our progress.
In[]:=
SaveUnityScene[];
3. Start the simulation.
In[]:=
UnityPlay[]
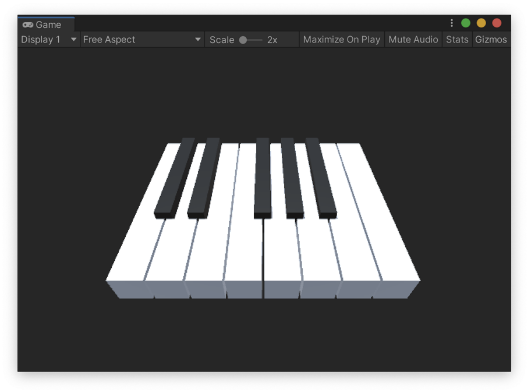
Demo - Piano
Demo - Piano
In this demo, we will create a playable piano. This will require:
◼
Importing audio assets into Unity.
◼
Adding custom scripts to game objects.
Scene Setup
Scene Setup
1. Create a new scene for our piano.
In[]:=
CreateUnityScene[File["Scenes/Piano"]]
Out[]=
UnityScene
2. Adjust the camera.
In[]:=
camera=FindUnityComponent[All,"Camera"];camera[["Transform","Position"]]={3.75`,6.75`,-3.5`};camera[["Transform","EulerAngles"]]={45.`,0.`,0.`};camera[["ClearFlags"]]="SolidColor";camera[["BackgroundColor"]]=GrayLevel[0.15];
3. Adjust the light.
In[]:=
light=FindUnityComponent["Directional Light","Light"];light[["Transform","EulerAngles"]]={90,0,0};
4. Prepare some material assets for the keys.
In[]:=
whiteMat=CreateUnityMaterial[File["Materials/White"],White]blackMat=CreateUnityMaterial[File["Materials/Black"],Black]
Out[]=
UnityMaterial
Out[]=
UnityMaterial
Interactivity with Scripts
Interactivity with Scripts
In Unity, we can write custom components using scripts. Each script defines a C# class that let’s us add unique behaviors to our game objects.
I have written a script below called PianoKey, which checks if the player clicked on its attached game object. If so, it will play an audio clip and a short animation.
In[]:=
pianoKeyScriptText//displayScript
Out[]=
1. Manually add the script to our project.
In[]:=
filepath=FileNameJoin[{$UnityAssetsDirectory,"Scripts","PianoKey.cs"}];Export[filepath,pianoKeyScriptText,"String"]
Out[]=
/Users/alecs/Desktop/UnityDemos/Assets/Scripts/PianoKey.cs
2. Force the Unity scripts in our scene to recompile.*
In[]:=
UnityTokenExecute[{"Assets","Refresh"}]
* This is only necessary if you don’t bring focus back to Unity before adding the script.
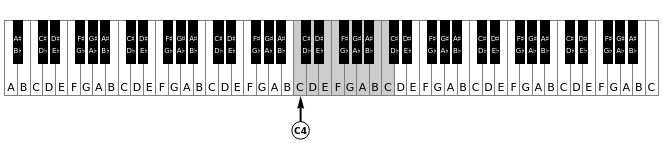
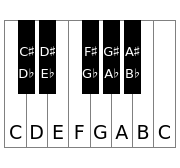
Anatomy of a Piano
Anatomy of a Piano
The modern piano has a total of 88 keys, 52 of which are white and are used to play the natural notes (A, B, C, D, E, F and G). The remaining 36 keys are black and are used to play the accidentals (A♯/B♭, C♯/D♭, D♯/E♭, F♯/G♭ and G♯/A♭).

The notes can be further divided into octaves, each of which contains 12 keys. Two keys with the same note but in different octaves will have different pitches.

To generate the notes, we can simply use the SoundNote function.
In[]:=
Audio[SoundNote["C4",3,"Piano"]]
Out[]=


We can get all the natural notes in the 4th octave by appending “4” to the note names.
In[]:=
naturalNotes={"C","D","E","F","G","A","B"};Table[Audio[SoundNote[note<>"4"]],{note,naturalNotes}]//AudioJoin
Out[]=

We can then do the same for the accidentals.
In[]:=
accidentalNotes={"C♯","D♯","F♯","G♯","A♯"};Table[Audio[SoundNote[note<>"4"]],{note,accidentalNotes}]//AudioJoin
Out[]=
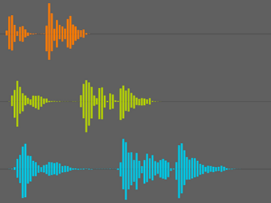
Audio Assets
Audio Assets
In order to play audio in our game, we need to generate Audio Clip assets. We can import Audio objects directly from the WL into Unity.
1. Define the notes we want to generate.
In[]:=
notes={"C4","D4","E4","F4","G4","A4","B4","C#4","D#4","F#4","G#4","A#4","C5"};
2. Create an Audio Clip asset for each note.
In[]:=
clips=Association[Table[audio=Audio[SoundNote[note,2.5,"Piano"]];noteCreateUnityAudioClip[File["Audio/note_"<>note],audio],{note,notes}]];
In[]:=
clips//Short
Out[]//Short=
C4UnityAudioClip,11,C5UnityAudioClip
Key Mesh Assets
Key Mesh Assets
The piano keys could be built from cube primitives, however I found that they’re simple enough to specify manually.
1. Define the dimensions of the keys.
In[]:=
whiteWidth=7/8;whiteLength=6;blackWidth=15/32;blackLength=4;height=7/8;gap=1/16;
2. Generate the base shape for each key type.
In[]:=
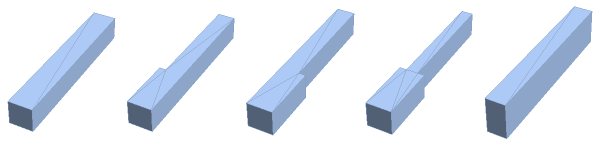
coordinates=;coordIndices={{1,2,3,4},{1,2,3,5,6,7},{1,2,8,9,10,4},{1,2,8,9,10,5,6,7},{9,11,12,10}};polygons=Table[Polygon[coordinates[[indices]]],{indices,coordIndices}];GraphicsRow[Graphics/@polygons,ImageSizeSmall]
Out[]=

3. Extrude the key shapes to create mesh regions.
In[]:=
line=BoundaryMeshRegion[{{0},{height}},Point[{{1},{2}}]];regions=Table[RegionBoundary[RegionProduct[BoundaryMeshRegion[polygon],line]],{polygon,polygons}];GraphicsRow[regions]
Out[]=
4. Create a Unity Mesh asset for each key mesh.
In[]:=
meshes=Table[CreateUnityMesh[File["Meshes/key_"<>ToString[i]],regions[[i]]],{i,Length[regions]}]
Out[]=
UnityMesh,UnityMesh,UnityMesh,UnityMesh,UnityMesh
Putting it All Together
Putting it All Together
Now that we’ve generated all the necessary assets, we can combine them to make our piano.
To save time, I’ve defined the relevant properties for each key in two lists, which will allow us to generate all the keys at once.
1. For each key, specify the computer keyboard key it corresponds to, the musical note it should play, and the index of the mesh it should use.
In[]:=
whiteKeys={"Keycode""q","Note""C4","Mesh"3,"Keycode""w","Note""D4","Mesh"4,"Keycode""e","Note""E4","Mesh"2,"Keycode""r","Note""F4","Mesh"3,"Keycode""t","Note""G4","Mesh"4,"Keycode""y","Note""A4","Mesh"4,"Keycode""u","Note""B4","Mesh"2,"Keycode""i","Note""C5","Mesh"1};(*Themeshindexfortheblackkeysareimplicitlyassumedtobe5*)blackKeys={<|"Keycode""2","Note""C#4"|>,<|"Keycode""3","Note""D#4"|>,Null,(*Representsthegapbetweenthe2ndand3rdblackkeys*)<|"Keycode""5","Note""F#4"|>,<|"Keycode""6","Note""G#4"|>,<|"Keycode""7","Note""A#4"|>};
2. Create a parent game object to organize all the keys.
In[]:=
parent=CreateUnityTransform["Piano Scale"]
Out[]=
UnityTransform
3. Iterate to generate all the white key game objects.
In[]:=
Do[key=whiteKeys[[i]];name="Key "<>key["Note"]<>" (White)";go=CreateUnityGameObject[name,meshes[[key["Mesh"]]]];go[["Transform","Position"]]={(i-1)*(whiteWidth+gap),0,0};go[["Transform","Parent"]]=parent;script=CreateUnityComponent[go,"PianoKey"];script[["Key"]]=key["Keycode"];script[["Clip"]]=clips[key["Note"]];,{i,Length[whiteKeys]}]
4. Similarly generate the black keys.
In[]:=
Do[key=blackKeys[[i]];If[key===Null,Continue[]];name="Key "<>key["Note"]<>" (Black)";go=CreateUnityGameObject[name,meshes[[5]]];go[["Transform","Position"]]={(i-1)*(whiteWidth+gap),1/4,0};go[["Transform","Parent"]]=parent;script=CreateUnityComponent[go,"PianoKey"];script[["Key"]]=key["Keycode"];script[["Clip"]]=clips[key["Note"]];,{i,Length[blackKeys]}]
5. Assign the materials we created earlier.
In[]:=
whiteMat=FindUnityAsset["White","Material"];blackMat=FindUnityAsset["Black","Material"];whiteMeshRenderers=FindUnityComponent["*White*","MeshRenderer",All];Do[wmr[["SharedMaterial"]]=whiteMat,{wmr,whiteMeshRenderers}]blackMeshRenderers=FindUnityComponent["*Black*","MeshRenderer",All];Do[bmr[["SharedMaterial"]]=blackMat,{bmr,blackMeshRenderers}]
Play the Piano
Play the Piano
1. Save our scene for good measure.
In[]:=
SaveUnityScene[];
2. Play the piano.
In[]:=
UnityPlay[]
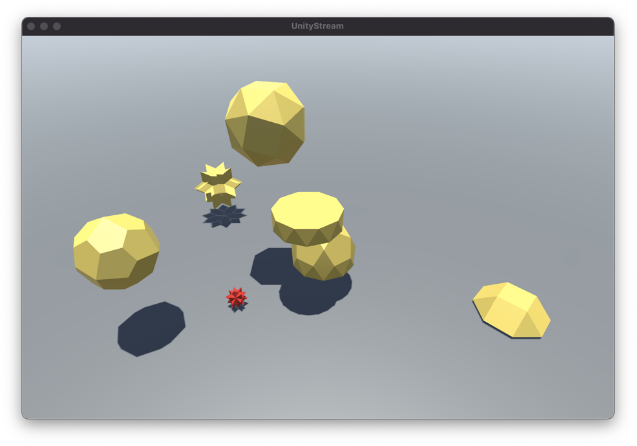
Demo - Polyhedron Dodger
Demo - Polyhedron Dodger
In this demo, we will create a simple game where the player tries to dodge large polyhedra falling from the sky.
Scene Setup
Scene Setup
1. Create a new scene.
In[]:=
CreateUnityScene[File["Scenes/PolyhedronDodger"]]
Out[]=
UnityScene
2. Create a floor game object.
In[]:=
floor=CreateUnityPlane["Floor"];floor[["LocalScale"]]={100,1,100};floor["MeshRenderer"][["Material"]]=FindUnityAsset["Gray","Material"];
3. Adjust the camera.
In[]:=
camera=FindUnityGameObject["Main Camera"];camera[["Position"]]={0,20,-20};camera[["EulerAngles"]]={35,0,0};
4. Adjust the light.
In[]:=
light=FindUnityGameObject["Directional Light"];light[["Position"]]={0,100,0};light[["EulerAngles"]]={90,0,0};
Custom Scripts
Custom Scripts
Once again, we’ll be using scripts to add custom behaviors to our game objects.
PlayerController
PlayerController
The PlayerController script does two main tasks:
◼
Apply physical forces to the player rigidbody to move it using WASD controls.
◼
Checks if the player lost, and if so displays a game over message.
In[]:=
playerControllerScript//displayScript
Out[]=
FallingObject
FallingObject
The FallingObject script also has two main tasks:
◼
Reset the object to a random position in the sky when it falls too low.
◼
Check if it collided with the player.
In[]:=
fallingObjectScript//displayScript
Out[]=
Create the PlayerController and FallingObject script assets.
In[]:=
filepath1=FileNameJoin[{$UnityAssetsDirectory,"Scripts","PlayerController.cs"}];filepath2=FileNameJoin[{$UnityAssetsDirectory,"Scripts","FallingObject.cs"}];Export[filepath1,playerControllerScript,"String"]Export[filepath2,fallingObjectScript,"String"]
Out[]=
/Users/alecs/Desktop/UnityDemos/Assets/Scripts/PlayerController.cs
Out[]=
/Users/alecs/Desktop/UnityDemos/Assets/Scripts/FallingObject.cs
Create the Player
Create the Player
1. Find the Spikey mesh asset we created earlier.
In[]:=
spikey=FindUnityAsset["Spikey"]
Out[]=
UnityMesh
2. Create the player game object with the mesh.
In[]:=
gameObject=CreateUnityGameObject["Player",spikey]
Out[]=
UnityGameObject
3. Adjust the size and position of the player.
In[]:=
gameObject[["Position"]]={0,0.7,0}gameObject[["LocalScale"]]={1/3,1/3,1/3}
4. Add a Rigidbody component.
In[]:=
CreateUnityRigidbody[gameObject]
Out[]=
UnityRigidbody
In[]:=
gameObject["MeshCollider"][["Convex"]]=True
5. Add the PlayerController script.
In[]:=
CreateUnityComponent[gameObject,"PlayerController"]
Out[]=
UnityScript
6. Update the material.
In[]:=
gameObject["MeshRenderer"][["Material"]]=FindUnityAsset["Red","Material"];
7. Set the tag so the falling objects know when they collide with the player.
In[]:=
gameObject[["Tag"]]="Player";
Polyhedron Objects
Polyhedron Objects
1. Generate some polyhedrons from PolyhedronData.
In[]:=
names={"RhombicHexecontahedron","SquareCupola","SnubCube","GyroelongatedPentagonalCupolarotunda",{"Antiprism",10},"PentagonalIcositetrahedron"};polyhedrons=Table[RegionResize[PolyhedronData[name,"MeshRegion"],{5}],{name,names}];GraphicsRow[polyhedrons]
Out[]=

2. Create a Mesh asset for each polyhedron.
In[]:=
meshes=Table[CreateUnityMesh[File["Meshes/polyhedron_"<>ToString[i]],polyhedrons[[i]]],{i,Length[polyhedrons]}]
Out[]=
UnityMesh,UnityMesh,UnityMesh,UnityMesh,UnityMesh,UnityMesh
3. Create the first falling object.
In[]:=
object=CreateUnityGameObject["Falling Object (1)",meshes[[1]]]
Out[]=
UnityGameObject
4. Update its material and renderer.
In[]:=
yellowMat=CreateUnityMaterialFile["Materials/Yellow"],;
In[]:=
object["MeshRenderer"][["Material"]]=yellowMat;
5. Add a Rigidbody.
In[]:=
rb=CreateUnityRigidbody[object];rb[["Drag"]]=1.0;
In[]:=
object["MeshCollider"][["Convex"]]=True(*Triggersdonotreacttocollision,butwilltriggeranevent*)object["MeshCollider"][["IsTrigger"]]=True
6. Add the FallingObject script.
In[]:=
CreateUnityComponent[object,"FallingObject"]
Out[]=
UnityScript
7. Automatically generate game objects for the remaining polyhedrons, using the first one as a template.
In[]:=
Do[go=CreateUnityGameObject["Falling Object ("<>ToString[i]<>")",object];go["MeshFilter"][["SharedMesh"]]=meshes[[i]];go["MeshCollider"][["SharedMesh"]]=meshes[[i]];,{i,2,Length[polyhedrons]}]
Play the Game
Play the Game
1. Save the scene.
In[]:=
SaveUnityScene[];
2. Play the game.
In[]:=
UnityPlay[]
3. Build the game for my platform (MacOS).
In[]:=
UnityBuild[]
Out[]=
Success
SystemOpen[...]
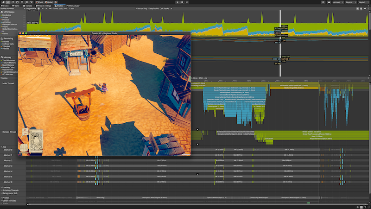
Example of Piano WebGL build:
Thank You!
Thank You!
Learn More About UnityLink
Learn More About UnityLink
Previous Talks on UnityLink
Previous Talks on UnityLink
Questions?
Questions?
In[]:=
go=FindUnityGameObject["Floor"]
Out[]=
UnityGameObject
In[]:=
go["Position"]
Out[]=
{1.,2.,3.}
Library
Library
Scripts
Scripts
DisplayScript
DisplayScript
PianoKey
PianoKey
PlayerController
PlayerController
FallingObject
FallingObject
CITE THIS NOTEBOOK
CITE THIS NOTEBOOK
Build your first game in the Wolfram Language with Unity game engine
by Alec Shedelbower
Wolfram Community, STAFF PICKS, May 18 2023
https://community.wolfram.com/groups/-/m/t/2921593
by Alec Shedelbower
Wolfram Community, STAFF PICKS, May 18 2023
https://community.wolfram.com/groups/-/m/t/2921593