One To-Do list a day keeps the oblivion away
One To-Do list a day keeps the oblivion away
Organizing your life and work with a To-Do list, in Mathematica!
Because of the well-known reason, lots of people have temporarily changed to a quite different lifestyle. For some of us who stay at home and work from home for a long time, it can become hard to track a regular life and work routine. For many of us who are supposed to reduce our frequency of visiting crowded public place like a market, it would be a good practice to watch our pantries and have plans in advance for necessities.
For those kinds of purposes, To-Do list is a quite handy choice. To avoid installing yet another program for just a simple purpose, I decided to make my own using the flexible Notebook stack -- as I nearly always have a Mathematica running on desktop all the time. This small tool helped me a lot in last 2 months during which time I have to stay at home, so I’m sharing it to the community, hoping it can be of help for others.
What does it feel like?
-- Experience of the To-Do list
What does it feel like?
-- Experience of the To-Do list
-- Experience of the To-Do list
My approach to a To-Do list is directly through notebook programming. But instead of heavily relying on Dynamic framework, I try to minimize and localize it’s usage as much as possible, so we can have a mostly static notebook.
The state pickers (the RadioButtonBars at the right end) of item Cells are implemented in the stylesheet, so the To-Do list it self is pure static and easy to programly manipulate.
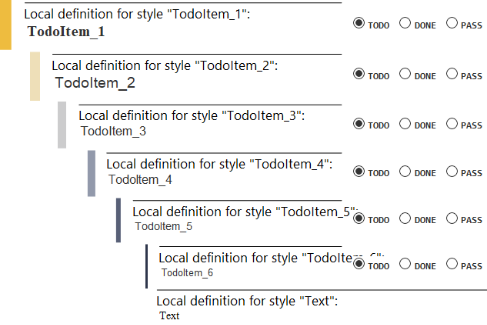
Currently the state of an item is encoded as style options of its cell, which is not good and subject to change. (I'm still looking for a nice and generic way to store data locally in a cell.)
Features
Features
◼
Every item has a state picker at the right end:
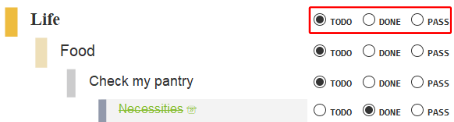
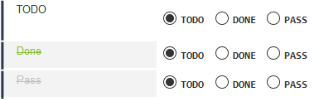
The default stylesheet has 3 states:
◼
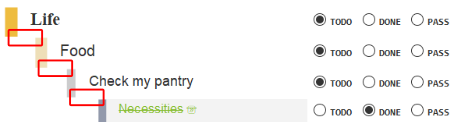
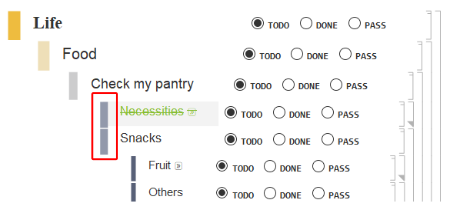
Multiple item levels are available, with progressive indentations:
◼
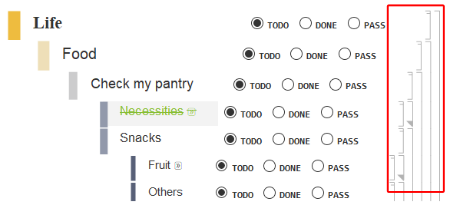
Items of different levels group and fold like Section/Subsection styles:
Shortcuts
Shortcuts
◼
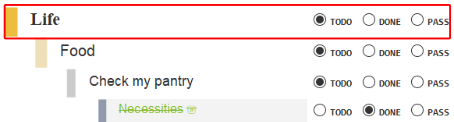
Pressing + key will create a new level 1 item cell.
Alt
a
◼
Pressing key in an item cell will create a new item cell of the same level. This behaviour minics the Item/Subitem styles.
Enter
◼
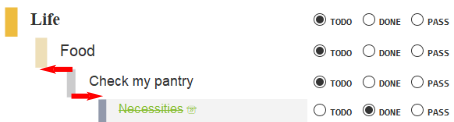
Pressing or key at the beginning of an item cell will push it to 1 level down. Pressing + or key at the beginning of an item cell will pull it to 1 level up. This behaviour minics the Item/Subitem styles.
Tab
*
Shift
Tab
Backspace
What does it feel like?
-- Meta-experience of the To-Do list
What does it feel like?
-- Meta-experience of the To-Do list
-- Meta-experience of the To-Do list
Readers who are happy with our default To-Do stylesheet can safely ignore the section below, where we’ll walk through how this To-Do list is made. But if you want to generate your own stylesheet, please do take a look.
As a highly programmable GUI, we are of course not stopping at one stylesheet. In fact we have this much more efficient way to generate To-Do list stylesheets as many as we want through notebook programming.
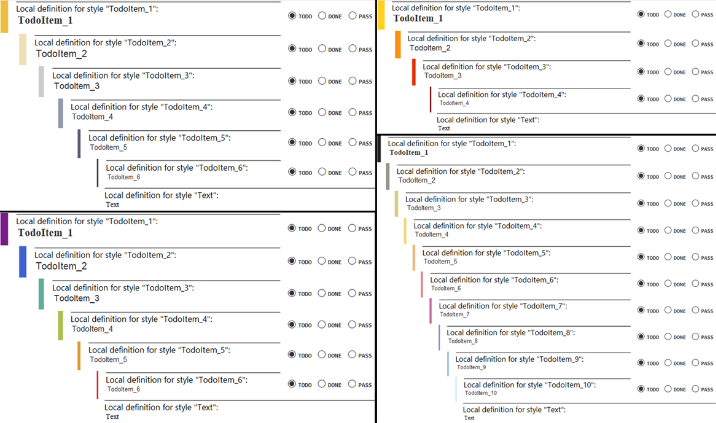
General design
General design
Implementation of features
Implementation of features
In general design, we indent cells with CellMargins, stylize them with CellFrame and CellFrameStyle.
The state picker is implemented as a stand-alone cell in CellFrameLabels. We’ll talk about it later.
Section-like grouping behaviour is realized through setting proper CellGroupingRules.
Implementation of shortcuts
Implementation of shortcuts
MenuCommandKey is used to implement 1st shortcut.
Two options, DefaultNewCellStyle and ReturnCreatesNewCell, are used to implement 2nd shortcut.
StyleKeyMapping is used to implement 3rd shortcut.
The state picker
The state picker
Our state picker is a RadioButtonBar[Dynamic[status, …]], but we are doing more than usual inside the 2nd argument of Dynamic.
Firstly we using notebook API SelectionMove and SelectedCells to locate whatever cell this controller lives in, then we change its style according to the localized controller state status, a dummy variable that doesn’t persist in the notebook file. (This behaviour is subject to change as soon as I determine how I want to persist data.)
Code
Code
We put the full code we used to generate our To-Do list stylesheets here.
Helper functions
Helper functions
Configuration
Configuration
A To-Do list stylesheet is fully described by two configuration variables.
State picker
myStatusConfig is used to describe all possible states and their styles.
Any number of states should be fine, the first one will be used as the default state. Localization can be done by using different language in "txt".
To-Do list
myStyleConfig is used to describe the appearance of the To-Do list itself.
◼
"levelRange" determines the most up and down levels the stylesheet will cover.
◼
"indent0" and "indentStep" determine how the indentation behaves.
◼
"frameRange" determines range of thickness of the leading bar in front of each cell.
All ranges are running from the most up level to deepest level.
Construction of state picker
Construction of state picker
We have gone through the basic principle above. Here is the full code for it.
Construction of stylesheet
Construction of stylesheet
Generating an instance of the stylesheet from myStyleConfig is basically applying a predefined template.
We can have a look at the stylesheet:
Using the stylesheet
Using the stylesheet
If you are satisfied with your newly generated stylesheet, you can choose to save it to user’s stylesheet folder:
You might need to restart the Front End to actually see it under menu-bar » Format » Stylesheet.
Or you can use it directly as a private stylesheet:
Hope this small To-Do list can be of help for those who need one. And it would be even better if you found notebook programming is interesting!