Introduction
Introduction
In 1958 S. Świerczkowski [5], answering a question of Steinhaus, proved that there cannot be a closed loop of regular tetrahedra meeting face-to-face (even ignoring the issue of whether the chain is embedded — no self-intersection). Such embedded loops do exist for the other four Platonic solids (see [2]). A natural question is how close a chain can come to closure and in [2] we conjectured that the discrepancy from closure can be arbitrarily small. Here we present a simple pattern that settles this question affirmatively. A more complete discussion is in [3]. Here is how Świerczkowski phrased the question in his unpublished memoir [6].
“Granted then, that the last pyramid in a Steinhaus chain never can have a sidewall in common with the first pyramid , it still may happen that all observations and measurements indicate that these two pyramids do have a sidewall in common. This would not contradict the mathematical result; it would only illustrate the obvious fact that no measurement is 100% accurate. So, a new problem is born: Whatever threshold of accuracy is selected, say, represented by a (small) number , will there be a chain of pyramids, returning to such that within the accuracy of ϵ inches, the last pyramid of the chain has indeed a sidewall in common with . It is hard to tell if anyone will ever want to devote her or his time to search for an answer to this question. In any case, it is unlikely that an answer would be easily found.”
P
ϵ
P
P
Our main theorem finds the answer. It is not surprising that nearly closed chains do exist, but it was pleasing to find that there is a simple pattern that proves it. The proof combines geometry and number theory, as continued fractions play a role.
Theorem. For any , there is an embedded chain of regular tetrahedra, meeting face-to-face, so that the discrepancy from a perfect loop is less than ϵ.
ϵ>0
We need some precise definitions.
Definition A tetrahedral chain is a finite sequence of congruent regular tetrahedra meeting face to face, but never doubling back through a just-used face. The gap of a chain is the smallest such that one can move each of the vertices of an exterior triangular face of the chain a distance no greater than so that the chain becomes a closed loop.
d
d
The Tetrahelix
The Tetrahelix
The tetrahelix (also known as the Boerdijk–Coxeter helix) is our basic tool: it’s a stack of tetrahedra corresponding to reflections in the faces . A simple explicit representation [4] can be given using cylindrical coordinates: let , , , and =(rcos(iθ),rsin(iθ),ih); then the tetrahelix consists of the tetrahedra formed by ,,…, (Fig. 1). For these points the tetrahedral edges have unit length. Note that there are left-handed and right-handed tetrahelices: the canonical using the coordinates just given is right-handed as it rises in a counterclockwise way as viewed from above (or: it rises around its axis so as to obey the right-hand rule); a reflection in any plane would change it to a left-handed tetrahelix.
1,2,3,4,1,2,3,4,1,2,3,4,…
θ=(2/3)
-1
cos
r=3
3
/10h=1/
10
V
i
TH
L
L
V
0
V
1
V
L+2
TH
L
Code for Figure 1
Code for Figure 1
Lval=16;ht=(Lval+2)h;im1=Show[Show[Graphics3D[{pp=polygonsUp[Take[specFormBetter[Lval],Lval]];EdgeForm[{Opacity[1],AbsoluteThickness[1.5],Black}],{Opacity[.8;.2],{Red,pp[[1]],Green,pp[[2]],Blue,pp[[3]],Yellow,pp[[4]],Red,pp[[5]],Green,pp[[6]],Blue,pp[[7]],Yellow,pp[[8]],Red,pp[[9]],Green,pp[[10]],Blue,pp[[11]],Yellow,pp[[12]],Red,pp[[13]],Green,pp[[14]],Blue,pp[[15]],Yellow,pp[[16]]}},AbsolutePointSize[10],{RGBColor[.4,1,1],Sphere[#,.05×1.7]&/@TH[Lval]},{AbsoluteThickness[1],Black,Opacity[1],Line[{{{0,r,0},{0,-r,0}},{{r,0,0},{-r,0,0}}}],Line[{{{0,r,ht},{0,-r,ht}},{{r,0,ht},{-r,0,ht}}}];{}},AbsolutePointSize[6],Point[{0,0,0}]}]],ParametricPlot3D[{rCos[θ],rSin[θ],0},{θ,0,2π},PlotStyle{Black,AbsoluteThickness[2]}],ParametricPlot3D[{rCos[θ],rSin[θ],ht},{θ,0,2π},PlotStyle{Black,AbsoluteThickness[2]}];Graphics3D[{Magenta,Tube[Table[{rCos[Lθ],rSin[Lθ],hL},{L,0,Lval+2,.1×.5}],.04]}],ParametricPlot3D[{rCos[θ],rSin[θ],z},{θ,0,2π},{z,0,(2+Lval)h},PlotStyle{Blue,Opacity[.03]},Mesh{8,Lval+1}];BoxedFalse,Lighting"Neutral",ViewVertical{0,0,1},ViewPoint{1,-2,1},ImageSize120,PlotRange{{-.63,.63},{-.63,.63},{-.1,ht1.02}}]/.RedRGBColor[1,.4,.4]/.GreenRGBColor[.3,1,.3]/.BlueRGBColor[.3,.3,1]/.YellowRGBColor[1,1,.4];θθ=π/4+.65;im2=Show[im1,ViewPoint{1Cos[θθ],-2Sin[θθ],-.1},ImageSize120,ViewVertical{{0,0,1},{-1,0,0}}[[1]]]
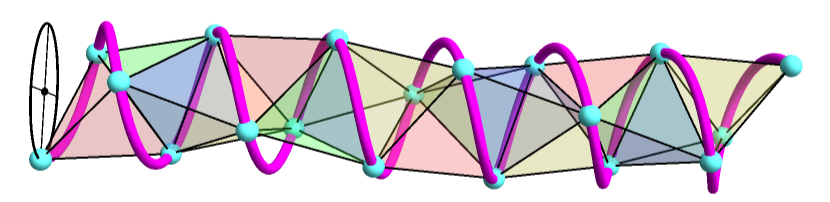
Figure 1. The tetrahelix made from 16 tetrahedra colored, in order, red, green, blue, yellow, red, green, blue, yellow, and so on. The vertices are equally spaced along a helix.
The Quadrahelix
The Quadrahelix
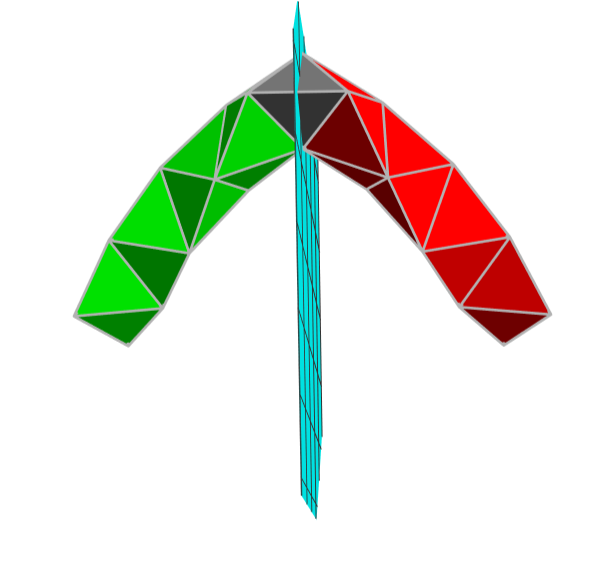
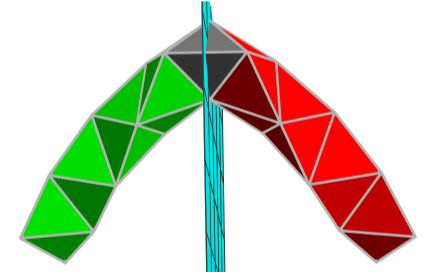
The quadrahelix is made from four tetrahelices as follows. Start with a pivot tetrahedron (gray in Fig. 2) and attach a right-handed copy of onto face 1 (red in Fig. 2) and a left-handed onto face 3 (green in Fig. 2). This shape is symmetric in the reflection plane—we call this the first quadplane—that splits the pivot and sends face 1 to face 3. Then reflect (as in Fig. 2(b)) this V-shaped object in the plane—we call this the biplane—defined by a terminal face of one of the tetrahelices (we always use the terminal green face as in Figs. 2(b) and 3). The second quadplane is the reflection of the first in the biplane.
QH
L
TH
L
TH
L
Code for Figure 2a
Code for Figure 2a
vvv={ViewPoint,ViewVertical}/.AbsoluteOptions
imLeft=Graphics[{Inset[im,{0,0},.5{1,1},2],{Text["biplane",{-.23,.06}],Text["end plane",{.6,-.048},{0,0},{1,-.37}],Text["start plane",{.56,.23},{0,0},{1,.49}],Text["first quadplane",{.11,.43},{0,0},{1,-3.9}],Text["second quadplane",{-.096,-.135},{0,0},{1,4}]};{}},Frame!True,AspectRatioAutomatic,PlotRange{{-.82,.89},{-.27,.82}},PlotRangePadding0,ImageSize320,BaseStyle{FontFamilyTimes,10}]
Code for Figure 2b
Code for Figure 2b
Code for Figure 3
Code for Figure 3
Code for Figure 3 Black background
Code for Figure 3 Black background
Code for Figure 5
Code for Figure 5
Embedding Proof
Embedding Proof
The Vanishing Gap
The Vanishing Gap
Code for Figure 6
Code for Figure 6
Code
Code
Million Digit Work
Million Digit Work
Code for Table
Code for Table
Code for Figure 7 Black
Code for Figure 7 Black
Code for Figure 7 White
Code for Figure 7 White
Conclusion
Conclusion
Code for Figure 8
Code for Figure 8
References
References