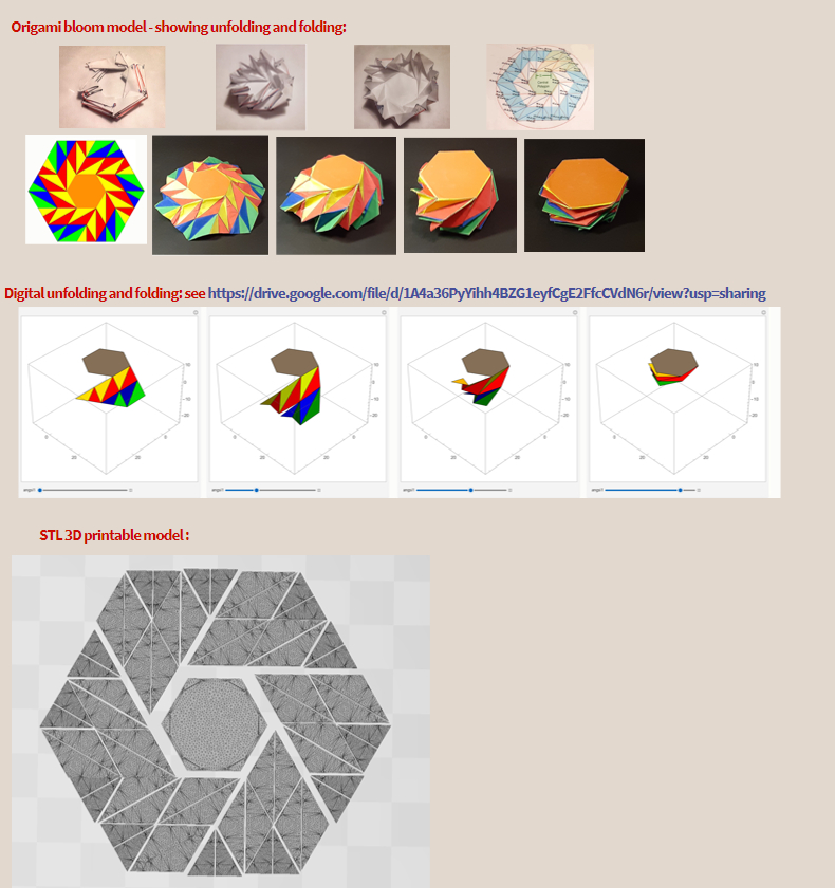
Summary: We use a bloom pattern here for an educational outreach program to show how a solar sail or a solar shield could be constructed, stored, and launched on a spacecraft. A Bloom pattern origami is constructed about a central polygon such that the wedges can be collapsed into a folded object the size of the central polygon. The main construction used here is from a paper by Wang, Lang, & Howell, 2025 (Ref.1). The first figure of section 1 defines terms and definitions used in that reference. To see how NASA uses origami designs on spacecraft view the Seeker YouTube video (Ref. 2) and the other references given here. We show the folding process. A 3D printable STL file is generated for the individual panels which can be tied together to illustrate a spacecraft launched solar shield. CITATION (original article): Wang, Z., Lang, R. J., & Howell, L. L. (2025). Bloom patterns: radially expansive, developable and flat-foldable origami. Proceedings of the Royal Society A: Mathematical, Physical and Engineering Sciences, 481(2320). https://doi.org/10.1098/rspa.2025.0299
1.0) Notation Figures
1.0) Notation Figures
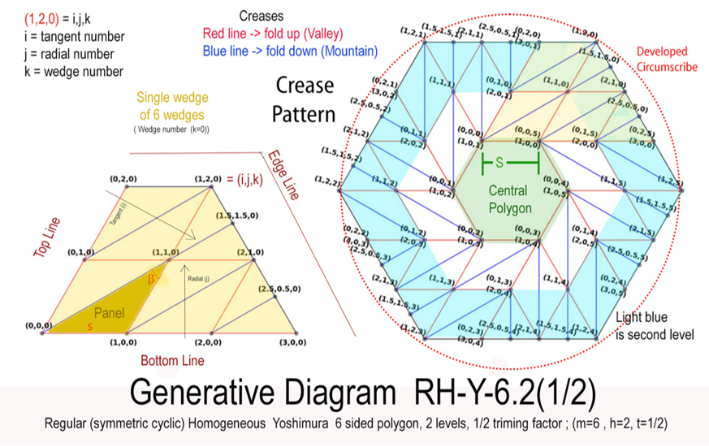
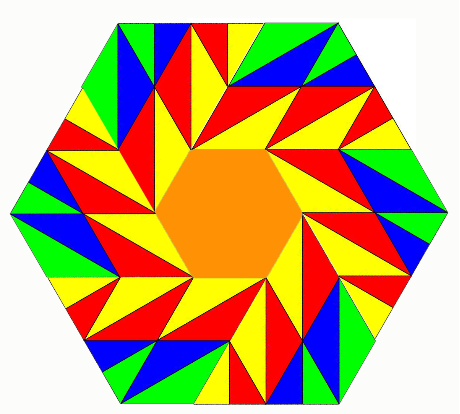
These figures (given below) gives the terminology used for the Yoshimura hexagon origami construction. It is generated using the notation given by Wang, Lang, & Howell, 2025 (Ref.1). We will derive the locations and red and blue folding lines given in this figure.
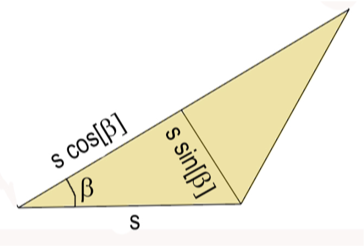
Note : Isosceles triangle area = 2 s^2 Cos[β] Sin[β] = s^2 Sin[2 β] = s^2 Sin[α]
2.0) Input Data for m=6 (Hexagon central polygon):
2.0) Input Data for m=6 (Hexagon central polygon):
In[]:=
m=6;(*WedgesinYoshimurabloompatternsanddegree-6verticesi.e.hexagon(m=6)p.14*);
In[]:=
s=12.;(*Sidelengthofthecentralpolygon(s=6)Determiningtheoverallsize*);
In[]:=
h=2;(*Numberradiallevels(h=2)*);
In[]:=
β=π/m;(*Acuteangleoftheisoscelestriangle30Deg,seePanelintheleftfigureabove*);
In[]:=
α=2β;(*Angleofwedgetip60Deg*);baselen=2sCos[β];(*Baselengthofisoscelestriangle20.78*);areaiso=s^2Sin[α]/2;(*Areaofisoscelestriangle62.35*);cirdia=2sSqrt[h^2+Csc[β]^2/4−hCsc[β]Cos[3β−3π/2]];(*Developed(unfolded)circumscribeddiameter72=s*m=12*6*);cirfold=sCsc[β];(*Foldedcircumscribeddiameter2*s=2*12=24*);darea=(ms^2/2)*((h^2+2h)Sin[α]+Cot[β]/2);(*Developedareasize3367.10*);foldarea=ms^2Cot[β]/4;(*FoldedAreasize374.12*);numpanels=m(h^2+3h);(*Numberofpanels60i.e,6wedgesand10panelsperwedge*);
3.0) Deriving the 9 set points for each of the 6 wedges
3.0) Deriving the 9 set points for each of the 6 wedges
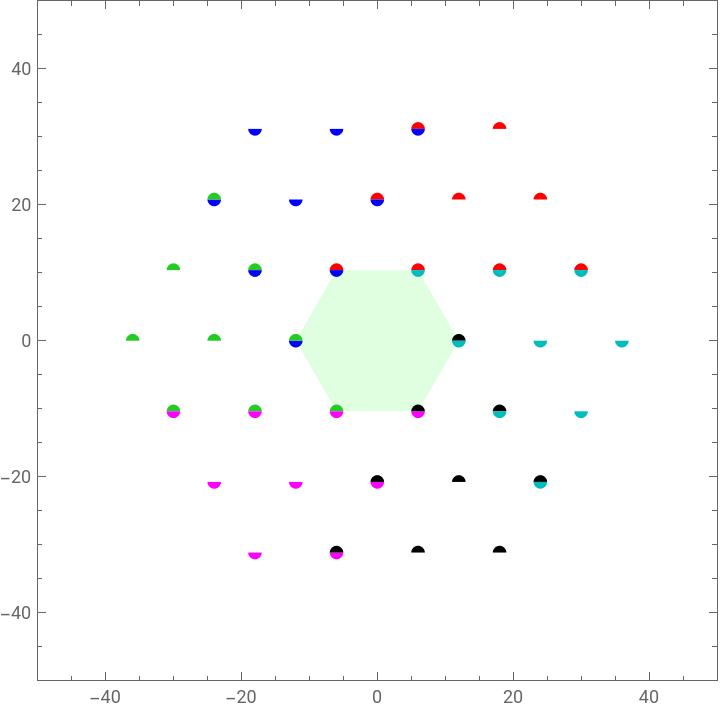
There are 6 wedges with one associated per side of the central polygon.
There are 9 major points per wedge given by setpoints (i,j,k).
There are 9 major points per wedge given by setpoints (i,j,k).
In[]:=
setpoints[k_]:={{0,0,k},{1,0,k},{2,0,k},{3,0,k},{0,1,k},{1,1,k},{2,1,k},{0,2,k},{1,2,k}}
In[]:=
sps[n_]:=setpoints[kk][[n]](*SetPointSlocationfortheninepointsforkk*)
The wedgeponts as function of i (tangent) , j (radial), k (wedge number) are given by Formula (6.6) in Ref (1).
The size is given by s, the length of one side of the hexagon, and the angle β = 30 degrees. The first term is the counter-clockwise rotation by angle 2 k β, the last term is the translation as a function of β, and the middle term is a linear transformation that rotates (0, j) clockwise toward (i, 0) for the angle between them to be 2β.
The size is given by s, the length of one side of the hexagon, and the angle β = 30 degrees. The first term is the counter-clockwise rotation by angle 2 k β, the last term is the translation as a function of β, and the middle term is a linear transformation that rotates (0, j) clockwise toward (i, 0) for the angle between them to be 2β.
In[]:=
wedgepoints[s_,β_,{i_,j_,k_}]:=s
.
.
+
Cos[2kβ] | -Sin[2kβ] |
Sin[2kβ] | Cos[2kβ] |
1 | Cos[2β] |
0 | Sin[2β] |
i |
j |
- 1 2 |
1 2 |
In[]:=
poly=Graphics[{LightGreen,RegularPolygon[{12,0},6]},FrameTrue,PlotRange{{-50,50},{-50,50}},AspectRatio->"Automatic"];
In[]:=
wpt=0;sps[n_]:=setpoints[wpt][[n]];pts1=Table[wedgepoints[s,β,sps[n]],{n,1,9}];wedge1=Graphics[{Red,PointSize[0.026],Disk[pts1,1,{0,Pi}]},FrameTrue,PlotRange{{-50,50},{-50,50}},AspectRatio->"Automatic"];
In[]:=
wpt=1;sps[n_]:=setpoints[wpt][[n]];pts2=Table[wedgepoints[s,β,sps[n]],{n,1,9}];wedge2=Graphics[{Blue,PointSize[0.018],Disk[pts2,1,{Pi,2Pi}]},FrameTrue,PlotRange{{-50,50},{-50,50}},AspectRatio->"Automatic"];
In[]:=
wpt=2;sps[n_]:=setpoints[wpt][[n]];pts3=Table[wedgepoints[s,β,sps[n]],{n,1,9}];wedge3=Graphics[{StandardGreen,PointSize[0.016],Disk[pts3,1,{0,Pi}]},FrameTrue,PlotRange{{-50,50},{-50,50}},AspectRatio->"Automatic"];
In[]:=
wpt=3;sps[n_]:=setpoints[wpt][[n]];pts4=Table[wedgepoints[s,β,sps[n]],{n,1,9}];wedge4=Graphics[{Magenta,PointSize[0.012],Disk[pts4,1,{Pi,2Pi}]},FrameTrue,PlotRange{{-50,50},{-50,50}},AspectRatio->"Automatic"];
In[]:=
wpt=4;sps[n_]:=setpoints[wpt][[n]];pts5=Table[wedgepoints[s,β,sps[n]],{n,1,9}];wedge5=Graphics[{Black,PointSize[0.008],Disk[pts5,1,{0,Pi}]},FrameTrue,PlotRange{{-50,50},{-50,50}},AspectRatio->"Automatic"];
In[]:=
wpt=5;sps[n_]:=setpoints[wpt][[n]];pts6=Table[wedgepoints[s,β,sps[n]],{n,1,9}];wedge6=Graphics[{StandardCyan,PointSize[0.004],Disk[pts6,1,{Pi,2Pi}]},FrameTrue,PlotRange{{-50,50},{-50,50}},AspectRatio->"Automatic"];
In[]:=
Show[poly,wedge1,wedge2,wedge3,wedge4,wedge5,wedge6]
Out[]=
4.0) Determine the folding lines and edge line for a wedge
4.0) Determine the folding lines and edge line for a wedge
M-> mountain line, V-> valley line, and E-> edge line
In[]:=
LinesM1[s_,β_,i_,j_,k_]:=Line[{{wedgepoints[s,β,{i,j,k}],wedgepoints[s,β,{i+1,j+1,k}]}}];LinesM2[s_,β_,i_,j_,k_]:=Line[{{wedgepoints[s,β,{i,j,k}],wedgepoints[s,β,{i+0.5,j+0.5,k}]}}];LinesV1[s_,β_,i_,j_,k_]:=Line[{{wedgepoints[s,β,{i,j,k}],wedgepoints[s,β,{i,j+1,k}]}}];LinesV2[s_,β_,i_,j_,k_]:=Line[{{wedgepoints[s,β,{i,j,k}],wedgepoints[s,β,{i+1,j,k}]}}];LinesE1[s_,β_,i_,j_,k_]:=Line[{{wedgepoints[s,β,{i,j,k}],wedgepoints[s,β,{i+0.5,j-0.5,k}]}}];LinesE2[s_,β_,i_,j_,k_]:=Line[{{wedgepoints[s,β,{i,j,k}],wedgepoints[s,β,{i+1,j,k}]}}];
Define the 10 panels for wedge number kindex:
Functions for Rotating Polygons
Functions for Rotating Polygons
5.) Rotation of the Panels in a Wedge to Simulate Paper Folding
5.) Rotation of the Panels in a Wedge to Simulate Paper Folding
NOTE: Below, we are switching valleys and mountains, so that blue lines are a valleys and red lines are a mountains.
So the folds will be toward the backside of the central hexagon.
So the folds will be toward the backside of the central hexagon.
6.) 3D Printing of the Generated Bloom Panels
6.) 3D Printing of the Generated Bloom Panels
The two unique shape are panel-1 and panel-3. Hexagon is the third shape needed. All the panels can be made by flipping over panels 1 and 3.
Hence there are 6 panel-1 types per wedge and there are 6 wedges. There for for the 3D printing construction one needs 36 panel-1 types.
There are 4 panel -3 types per wedge. Hence on needs 24 panel-3 types for the project. The final construction would use wire loops to connect the hexagon
and the panels.
Final layout is shown above (without the wire connections:
Coordinate s for panels and hexagon
================================================================================
Calculate the hole locations
Calculate the hole locations
==================bottom line==1-2=========
(Note: For panels at edge they should have no bottom holds )
(Note: For panels at edge they should have no bottom holds )
==================right line====2-3=====================
==================left line ====3-1=====================
===========================================
===========================================
References
References
(1) Zhongyuan Wang , Robert J. Lang and Larry L. Howell, Bloom patterns: radially expansive, developable and flat-foldable origami , Proceedings of the Royal Society A, August 2025, 481 (2320).
(2) https://www.youtube.com/watch?v=Ly3hMBD4h5E
(3) https://www.nytimes.com/2025/08/19/science/origami-bloom-patterns.html
(4) https://www.jpl.nasa.gov/news/what-looks-good-on-paper-may-look-good-in-space/
(5) https://www.chemistryworld.com/features/hoisting-the-solar-sail/3004626.article
(6) https://www.youtube.com/watch?v=3E12uju1vgQ
(7) https://spacecraft.byu.edu/
(8) https://library.wolfram.com/infocenter/Articles/1786/
(9) https://science.nasa.gov/missions/hubble/a-hubble-sky-full-of-stars/
CITE THIS NOTEBOOK
CITE THIS NOTEBOOK
Bloom pattern for flat-foldable origami orbital solar sail or solar shield
by G. Allen Gary
Wolfram Community, STAFF PICKS, September 14, 2025
https://community.wolfram.com/groups/-/m/t/3545275
by G. Allen Gary
Wolfram Community, STAFF PICKS, September 14, 2025
https://community.wolfram.com/groups/-/m/t/3545275