Make your course Wolfram LTI Compatible
1
.Make a Wolfram Cloud Account
To utilize Wolfram LTI you will need a Wolfram Cloud account. If you do not have one already, click here to create one.
2
.Increase your Wolfram Cloud plan to support LTI tools
If you are affiliated with a university, see if your university has a site license to offer you more options on the Wolfram Cloud.
MIT faculty and students can find MIT’s Mathematica Online site license by searching for “wolfram” in Information Systems and Technology’s (IST) software browser or by clicking here. Here you can request access to Mathematica Online in order to obtain a plan with enough features to run Wolfram LTI tools.
MIT faculty and students can find MIT’s Mathematica Online site license by searching for “wolfram” in Information Systems and Technology’s (IST) software browser or by clicking here. Here you can request access to Mathematica Online in order to obtain a plan with enough features to run Wolfram LTI tools.
3
.Select the course to edit
Login to edX Studio (for a global course you will want to log in to studio.edx.org or studio.edge.edx.org, or if you are working on a campus based version of edX log in to your campus studio account like studio.mitx.mit.edu).In this guide we use studio, those who use XML to publish courses will have a different procedure, but the end result will be the same.
Inside studio, select the course into which you’d like to add a Wolfram LTI component.
4
.Set the module list
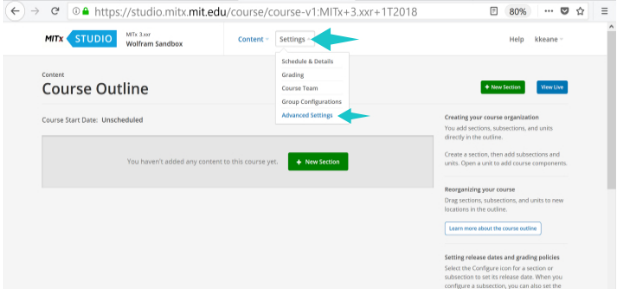
Navigate to the “Settings” tab near the top of the page, select “Advanced Settings”.
On the “Advanced Settings” page, locate the “Advanced Module List”. You can do this by searching () for “Advanced Module List” within this page.
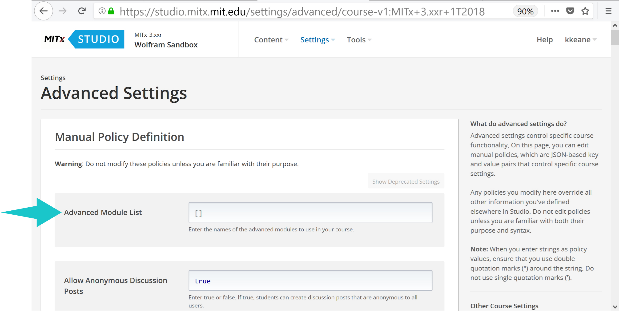
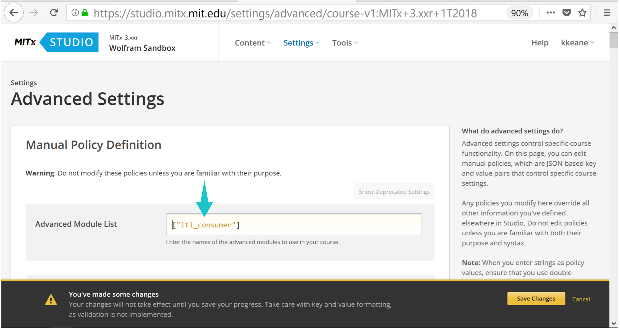
Inside the Advanced Modules List, enter “lti_consumer” within the square brackets. You should see [“lti_consumer”] in this field once you’re finished. If you have other advanced modules, they will be comma-separated, i.e. [“module 1”, “module 2”, ...].
5
.Generate a LTI Passport
For the next step, you will need to enter your LTI passport. You may generate a passport by following the link below. (Note: you must to be logged into a Wolfram Cloud account to generate a passport.)
6
.Set LTI passports
Next, locate “LTI passports” on the courses “Advanced Settings” page (search efficiently using ).
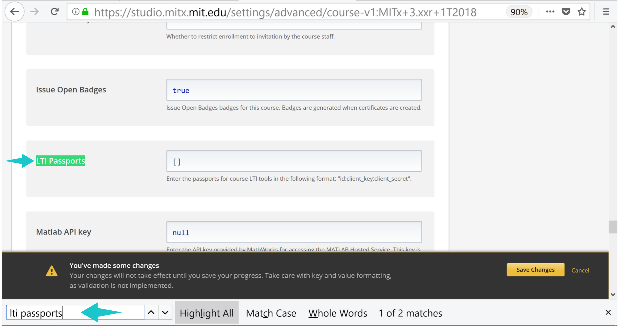
Inside the LTI Passports field, enter the passport you generated in step 3 within the square brackets. If you have other LTI components you may need to have them comma-separated, i.e. [“passport1”, “passport2”, ...].

Note the alert bar on the bottom of the page -- remember to save your changes. If successful, you should see an update that your changes have been saved.
Congratulations! your course is now Wolfram LTI compatible!